Translate

Monday, July 31, 2017

How to Use Padlet for class engagement 2017

How to Use Padlet 

A interesting tool for class engagement


Step 1) Sign up for Padlet either with Google or Facebook 


Step 2) Read--> Make a Padlet--> choose the template
Step 3) Share information--> double click anywhere and click the textbox
Inside the textbox (Type, Record voice, Add Hyperlink,Photo or Document) 
Step 4) Sample
Step 5) Editing--> Setting--> Modify: Title, Description, Wallpaper, Theme, Icon, Posting, Tag and Address
Step 6) Gear Tool
Step 7) Click ... --> Dropbox (Get help,Like, Remake...Delete)
Step 8) Security & Control --> Optional (Show to public, keep it private, secret or set password to protected your Padlet)
Step 9) Choose who can read, write, moderate or administer
Step 10) Share--> Copy link, Embed in your blog/website, Email, Facebook or Twitter
Step 11) Export file--> save a Pdf, image, csv or Excel spreadsheet
Step 12) Print
The End

Tuesday, July 25, 2017

How to use Popplet 2017


Introduction to Popplet 

"Step By Step on using popplet"

Popplet is the simplest tool to capture and organize your ideas. FREE to use iphone or ipad application that you can use to create mindmaps on your mobile.

Click: try it out
Step 1 Download a popplet app or Google Chrome Browser-->Popplet home page-->Log in or try it out version https://popplet.com/
Log in
Make New Popplet
Step 2 Try it out-->Popplet home page-->Tutorial box appear on the screen as below--> click next or click X
Step 3 Double click anywhere on the screen page--> create 1st popple
Step 4 Change your title (try it out version can't capture your name but if you have log in, your name will display automatically. 
Step 5 Change the title (if you want)
Step 6 If you want to hide your nametag-->Gear Menu-->View-->Hide nametag
Step 7 Popplet tools (Change colour, format font, size, allignment, draw and upload things)
Step 8 Move, Drag, Hold resize the popple (testing)
Step 9 Delete Popple (Click the X on top right corner)
Step 10 Comments--> add this comment (save automatically)-->back to main ** Comments can't move around and can't hide nametag, can't view able while printing
Step 11 Gear Menu 
Change background colour
Gear Menu: edit, organize, add content, view presentation and etc


Click Record for presentation
Click Record and Select the contents

Click Exit
Gear Menu: Export file
Step 12 Share (top right on the screen)
Copy and paste a Link or email your friends or embed it
Share a link
The End

Friday, July 21, 2017

Drags file into Google Drive+Google Docs with file uploads & Shorten URL 2017

"Step by step to upload a form based on Google Docs"

Step 1) Laptop: Open Google Chrome browser, Sign up Google mail (Create Gmail) 
Step 2) Mobile Phone/ipad or other electronic devices (please make sure you have the latest version of Google Chrome browser, if you don't have please download and install Google Chrome browser app)
Step 3) Go to drive google.com-->Open or create a folder-->Upload files and folders, drag them into the Google Drive folder Or Go to-->New-->File Upload-->Search your "Doc"


Step 4 On top Right Corner-> Editing Button (optional, can choose either editing, suggesting or viewing) 


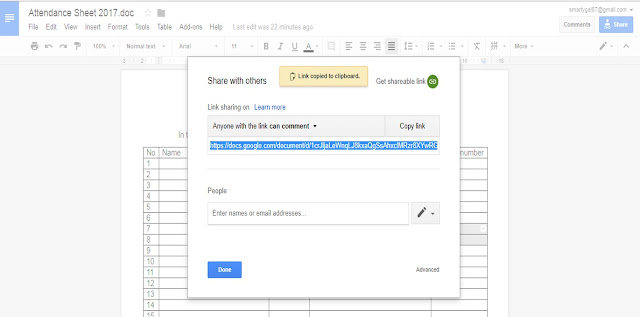
Step 5) If want to share the docs with others, click “share” button


Step 6) Share-->Share with others-->Get Shareable Link 


Step 7) Select Edit-->Done-->copy Link (before copy link, may choose anyone with the link can edit, comment or view)


Step 8) Link Sharing--> Click Advance-->Anyone with the link can edit/comment/view-->Owner settings-->Save changes 


Owner Settings

Ten 10 Research title generators (How do you write an attention-grabbing research title using a research title generator?)

Research title generator  Ten (10) research title generators appyie Capitalize my title ChatGPT Editpad Good content Premium paper Psycholog...